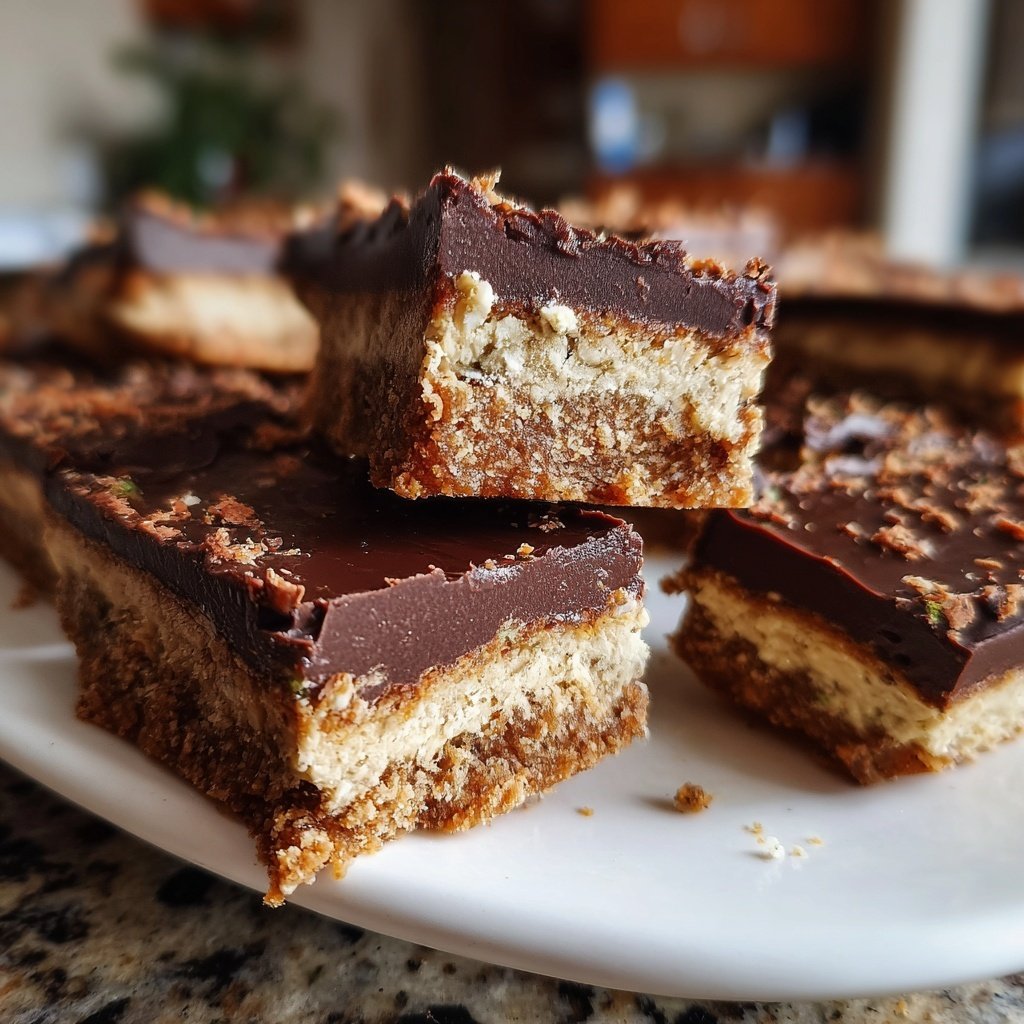
Chocolate Mint Slice Bars
Uitgelicht onder: Favoriete eenvoudige bakrecepten
I’ve always had a soft spot for desserts that combine luscious chocolate and refreshing mint, and these Chocolate Mint Slice Bars are my go-to treat for satisfying my cravings. The way the rich chocolate contrasts with the coolness of the mint is simply divine! Plus, the layers come together with minimal effort, making it a perfect choice for last-minute gatherings or a weekend sweet indulgence. I love how these bars allow me to showcase my baking skills while still being incredibly fun to make with friends.
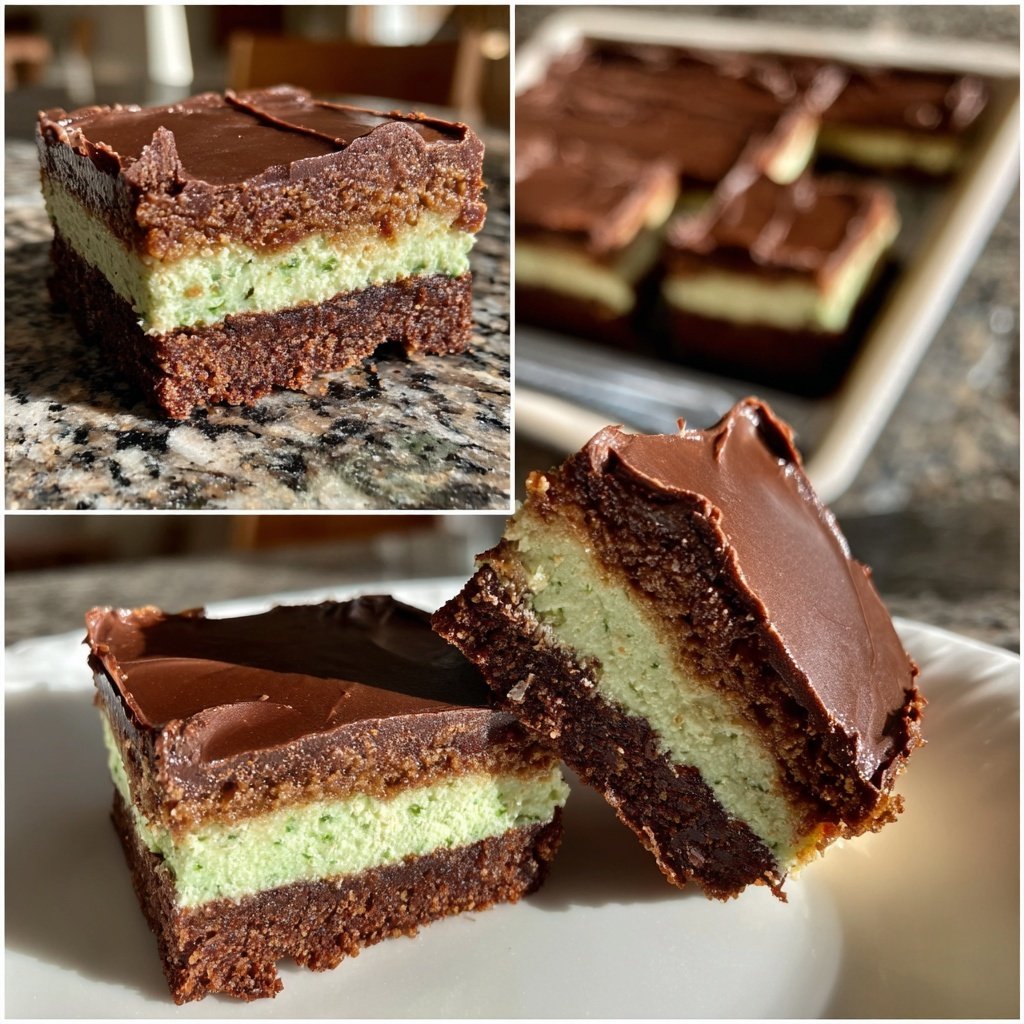
When I first decided to make these Chocolate Mint Slice Bars, I worried about getting the mint flavor just right. After several trials, I discovered that using fresh mint extract added an invigorating touch that complements the dark chocolate perfectly. The key is to let the layers set properly in the fridge so each bite holds its shape without being overly gooey.
These bars became a hit at my last party! I made a double batch and even topped some with crushed mint candies for an extra crunch. Watching my friends enjoy them was the best reward, and I can't wait to make them again for the upcoming holidays!
Why You'll Love These Bars
- Bold chocolate flavor balanced with refreshing mint
- Easy to prepare and perfect for sharing
- Decadent yet surprisingly light in texture
The Importance of Ingredients
Choosing the right type of chocolate for your topping is crucial for achieving the perfect balance of flavor and texture. I recommend using high-quality dark chocolate, preferably with a cocoa content of 60-70%. This ensures a rich and intense chocolate layer that complements the sweet mint filling beautifully. If you prefer a sweeter topping, you can opt for semi-sweet chocolate, but avoid milk chocolate, as its sweetness may overpower the dessert.
The mint layer in these bars relies heavily on the flavor of peppermint extract. When selecting your extract, make sure it's pure rather than synthetic to avoid any off-flavors. A high-quality peppermint extract will enhance the refreshing notes and contribute to the overall dessert experience. For a more natural option, you can also use peppermint oil; just remember that a little goes a long way—start with half the amount and adjust to your taste.
The base of crumbled digestive biscuits combined with cocoa powder provides both texture and that classic cookie crust flavor. If you're looking for a gluten-free alternative, crushed almond flour cookies or gluten-free digestive biscuits can work equally well. This adjustment can maintain the dessert's delightful crunch while accommodating dietary restrictions.
Tips for Perfect Layers
When pressing the base into the baking dish, be sure to use the back of a measuring cup or a flat-bottomed glass to achieve an even layer. This will help prevent air pockets and create a solid foundation for the mint filling. Refrigerating the base for at least 10 minutes not only helps it set but also makes it easier to spread the mint layer evenly without disturbing the crust, which is key for clean cuts later.
After spreading the mint layer, it's essential to refrigerate it long enough (around 15 minutes) to firm up before adding the chocolate topping. If you skip this step and pour the chocolate too soon, the layers may blend together, resulting in a less distinct taste experience. You want to allow each layer to stand out and shine through each bite, so patience pays off here.
To melt the chocolate topping effectively, use a microwave-safe bowl and heat in short bursts of 20-30 seconds, stirring in between to avoid burning. If the chocolate starts to seize or clump, you can add a little extra coconut oil to help smooth it back out. This will ensure a glossy finish that not only looks appetizing but also adheres beautifully to the mint layer, creating a deliciously satisfying bite.
Ingrediënten
Gather these simple ingredients to begin:
For the Base:
- 1 cup crushed digestive biscuits
- 1/2 cup unsweetened cocoa powder
- 1/2 cup melted butter
- 1/4 cup powdered sugar
For the Mint Layer:
- 1 cup sweetened condensed milk
- 1 teaspoon peppermint extract
- 2 cups powdered sugar
- 1-2 drops green food coloring (optional)
For the Chocolate Topping:
- 200g dark chocolate, chopped
- 1 tablespoon coconut oil
Make sure to have everything ready to go before you start!
Bereidingswijze
Let's get to the fun part of making these bars!
Prepare the Base
In a mixing bowl, combine crushed digestive biscuits, cocoa powder, melted butter, and powdered sugar. Mix until well combined and press the mixture evenly into the bottom of a greased 9x9-inch baking dish. Refrigerate for 10 minutes to set.
Make the Mint Layer
In a separate bowl, mix sweetened condensed milk, peppermint extract, powdered sugar, and green food coloring until smooth. Spread this mixture over the chilled crust and refrigerate for another 15 minutes.
Prepare the Chocolate Topping
Melt the dark chocolate and coconut oil together in a microwave-safe bowl, stirring until smooth. Pour this chocolate mixture over the mint layer, spreading evenly. Return to the fridge for 20 minutes until set.
Slice and Serve
Once set, cut into bars and serve. Enjoy the rich combination of flavors!
Enjoy your delicious homemade Chocolate Mint Slice Bars!
Professionele Tips
- For a fun twist, add crushed peppermint candies on top of the chocolate before it sets. It not only adds crunch but also enhances the mint flavor.
Storing Your Chocolate Mint Slice Bars
These Chocolate Mint Slice Bars are perfect for making in advance! Once set, store them in an airtight container in the refrigerator for up to one week. Being chilled enhances the layers and keeps the dessert fresh. If you're planning to freeze, wrap each bar individually in plastic wrap and place them in a freezer-safe container. They can stay frozen for up to three months, and you can simply thaw them in the fridge the night before serving.
When serving, let the bars sit at room temperature for about 10-15 minutes before cutting. This will soften the chocolate slightly and make it easier to slice while still keeping the integrity of the layers intact. I find that warm climate can affect the texture of the bars, so keeping them refrigerated until serving is usually best to maintain that perfect bite.
Variations and Customizations
Feel free to play with the flavors in these bars! For a twist, consider adding crushed peppermint candies on top of the chocolate layer before it sets for an added crunch and visual appeal. You can even infuse the mint layer with a hint of coconut by substituting a portion of the condensed milk with coconut cream, which adds a tropical flair.
If you want an entirely different flavor profile, you could switch out the peppermint extract for other flavors like orange or almond. Each alternative can create a unique but equally delicious bar, transforming the recipe to fit different taste preferences or seasonal delights. Just be careful with the quantity, as stronger extracts like almond can quickly overpower the dessert!
Vragen Over Recepten
→ Can I use a different type of chocolate?
Yes, you can use milk chocolate or even white chocolate for a different flavor profile.
→ How should I store these bars?
Keep the bars in an airtight container in the refrigerator for up to a week.
→ Can I freeze these bars?
Absolutely! Wrap them tightly and freeze for up to 3 months. Thaw in the fridge before serving.
→ What can I substitute for digestive biscuits?
Graham crackers or Oreo cookies can be great alternatives for the base.
Chocolate Mint Slice Bars
Gemaakt door: Lucy Thompson
Recepttype: Favoriete eenvoudige bakrecepten
Vaardigheidsniveau: Intermediate
Eindportie: 16 bars
Wat je Nodig Hebt
For the Base:
- 1 cup crushed digestive biscuits
- 1/2 cup unsweetened cocoa powder
- 1/2 cup melted butter
- 1/4 cup powdered sugar
For the Mint Layer:
- 1 cup sweetened condensed milk
- 1 teaspoon peppermint extract
- 2 cups powdered sugar
- 1-2 drops green food coloring (optional)
For the Chocolate Topping:
- 200g dark chocolate, chopped
- 1 tablespoon coconut oil
Stappen
In a mixing bowl, combine crushed digestive biscuits, cocoa powder, melted butter, and powdered sugar. Mix until well combined and press the mixture evenly into the bottom of a greased 9x9-inch baking dish. Refrigerate for 10 minutes to set.
In a separate bowl, mix sweetened condensed milk, peppermint extract, powdered sugar, and green food coloring until smooth. Spread this mixture over the chilled crust and refrigerate for another 15 minutes.
Melt the dark chocolate and coconut oil together in a microwave-safe bowl, stirring until smooth. Pour this chocolate mixture over the mint layer, spreading evenly. Return to the fridge for 20 minutes until set.
Once set, cut into bars and serve. Enjoy the rich combination of flavors!
Extra Tips
- For a fun twist, add crushed peppermint candies on top of the chocolate before it sets. It not only adds crunch but also enhances the mint flavor.
Voedingswaarde (Per Portie)
- Calories: 380 kcal
- Total Fat: 26g
- Saturated Fat: 15g
- Cholesterol: 195mg
- Sodium: 85mg
- Total Carbohydrates: 32g
- Dietary Fiber: 3g
- Sugars: 24g
- Protein: 6g